SQL Server
PhraseExpress can connect to  a Microsoft SQL Server to share phrases with a client-/server architecture in professional/enterprise networks.
Features
Benefits of using a SQL server:
- Phrase changes are immediately available to all users.
- SQL servers are designed to handle a large number of clients.
- Multiple users can edit the phrase database simultaneously. No need to wait until a user has finished editing.
- The client-/server architecture prevents write collisions and version conflicts.
- Clients load the phrase contents on demand in the moment of text insertion to minimize memory consumption on the local clients.
- The phrase database is centrally stored and can be included in your existing SQL backup system.
- License keys are centrally managed. No need to walk from computer to computer to enter license keys or change PhraseExpress configuration.
- You can define "master users" with extra credentials. Those have general access to all phrases and can centrally configure client program settings of all users.
- Each user can have a personal phrase folder to store their personal phrases.
Limitations
- PhraseExpress is very easy-to-use with a SQL Server, but setup in highly customized system environments may require advanced IT skills. We kindly ask for your understanding, that installation support in such case is not free-of-charge. If you are overwhelmed, please consider using PhraseExpress with cloud sharing which is easy to setup.
- Phrases are inserted with a small delay as the content is dynamically loaded from the SQL server over the network connection. For timing-critical applications such as spelling correction text replacements, you can use a separate additional local phrase file for all phrases, that is loaded into the fast local memory for instant insertion.
- The SQL database is not available if the network connection is interrupted.
- SQL Server support is not available for iOS or if using M1 hardware. Please use cloud sharing for Apple iOS devices.
Connect to SQL server
To connect a SQL server:
- Open the PhraseExpress main program window.
- Select the main menu command "".
- Enter the computer name or IP address of the Windows PC running the Microsoft SQL server:
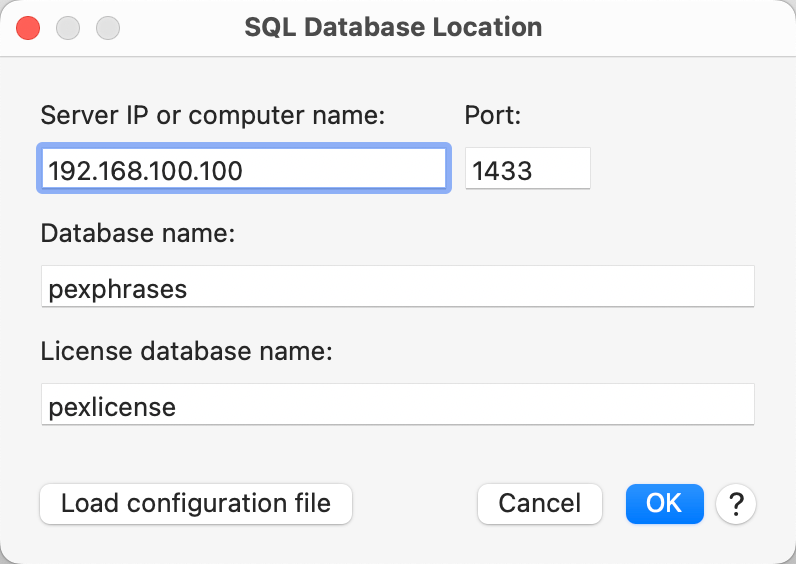
- Enter the SQL server (if different from the default port 1433).
- Enter the SQL (if different from the default name "phrases)".
If you don't know the SQL server connection data, you can create a configuration file in the "PhraseExpress SQL Client Manager". This file contains the connection information which can be loaded by clicking on "".
Troubleshooting
On a Mac, check following tips:
- Make sure, that SMB file sharing is enabled on the Mac under to allow the Mac finding the Windows computer by its computer name (see macOS help).
- Try both options to connect to the SQL Server, by the server computer name and alternatively by the IP address of the SQL server computer.
- Open the Terminal and try pinging the SQL server IP address (see important hint below):
Fix the network connection if you cannot ping the SQL server computer.
- Open "Terminal" by navigating to /Applications/Utilities.
- In the Terminal window type ping <server> , where <server> is the hostname or IP address of the server that you want to ping and press Enter.
- To stop pinging, press CMD + C.
Ping replies are disabled by default on Windows! ICMP responses must be enabled before you can ping a Windows PC:
- Open Windows Defender Firewall and select Advanced Settings in the sidebar.
- Switch to Inbound Rules via the Getting Started page or the sidebar.
- Find the rule named "Core Networking Diagnostics - ICMP Echo Request (ICMPv4-In)" with Profile of "Private, Public" (unless you're on a corporate domain).
- Right-click the rule and Enable Rule.